[디자인 패턴] 프록시 패턴, 데코레이터 패턴 (Proxy Pattern, Decorator Pattern)
프록시 패턴, 데코레이터 패턴이란?
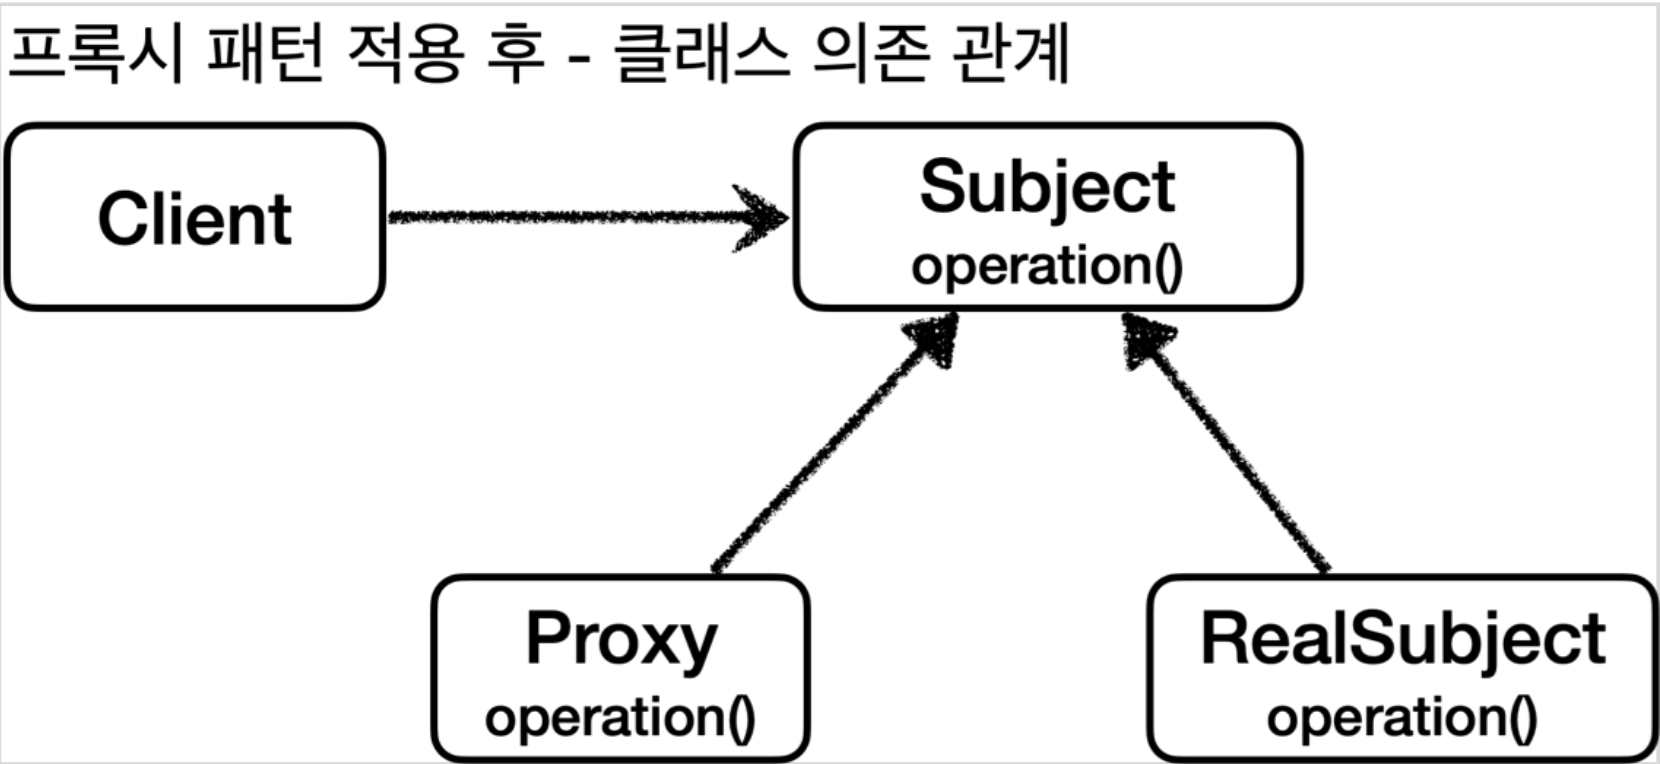
두 가지 패턴 모두 프록시를 사용한다. 프록시는 실제를 대신해서 처리해주는 대리자 역할을 한다.
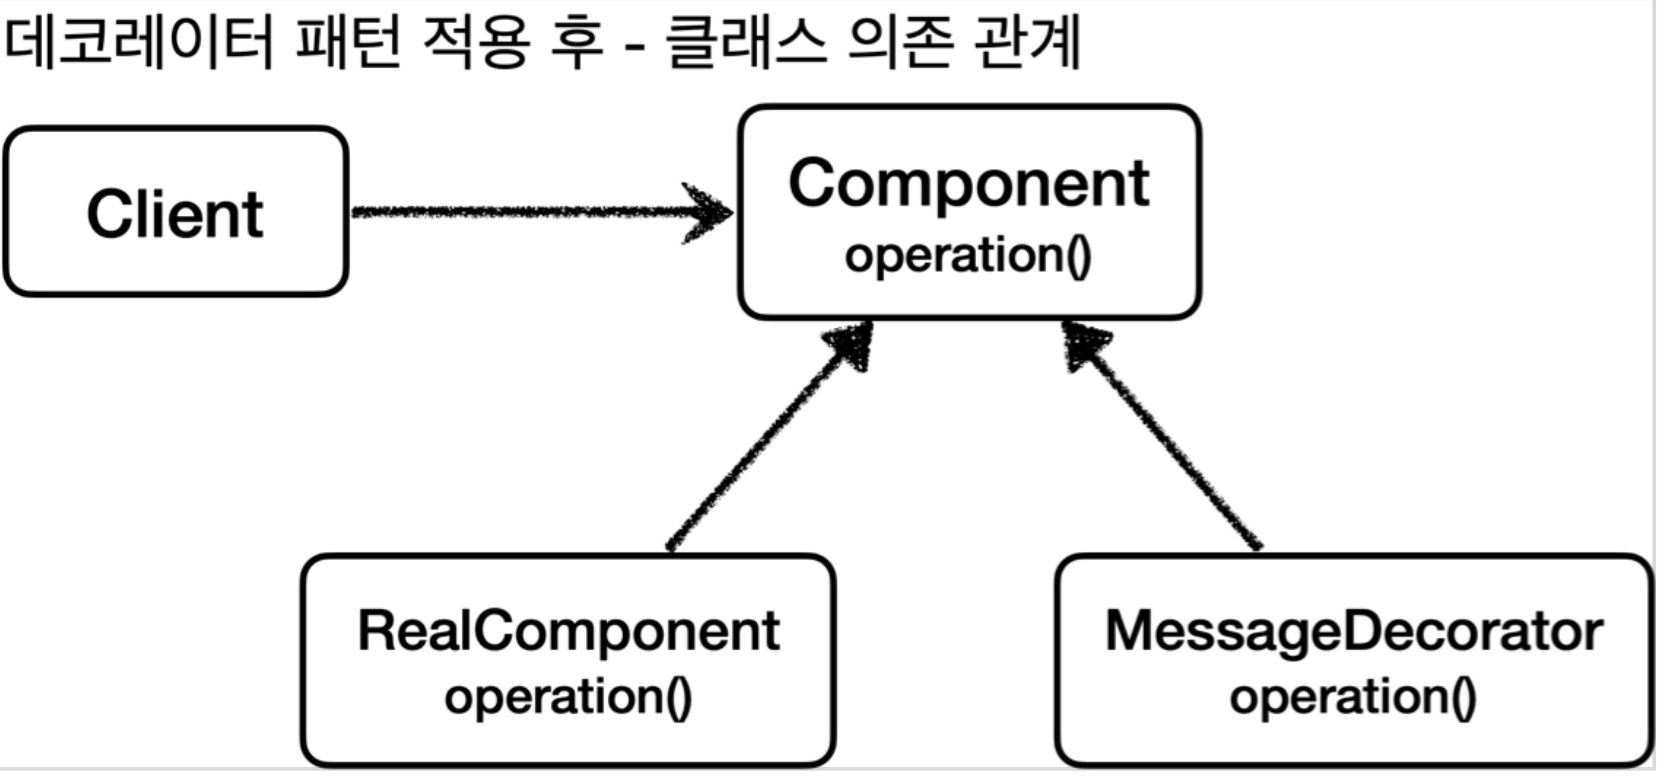
실제 객체와 프록시 객체는 동일한 인터페이스를 가져 클라이언트의 입장에서는 코드 변경 없이 동작할 수 있어야 한다.


대리자 역할을 수행하면서 얻는 이점은 다음과 같다.
- 접근 제어
- 권한에 따른 접근을 차단한다.
- 캐싱 로직을 적용한다.
- 지연 로딩이 가능하게 한다.
- 부가 기능 추가
- 원래 서버가 제공하는 기능을 더해서 부가 기능을 수행한다. ex) 값을 변경해서 전달, 실행 시간을 측정해서 로그를 남김
프록시 패턴과 데코레이터 패턴의 차이는 어떤 기능이 목적인지에 따라 정해진다. 프록시 패턴과 접근 제어의 목적, 데코레이터 패턴은 부가 기능 추가의 목적이 있다.
먼저, 실제 객체를 호출하는 예시를 보자.
실제 객체를 호출하는 예시

interface Subject {
    fun operation(): String
}
class ReadSubject : Subject {

    private val logger = LoggerFactory.getLogger(this::class.simpleName)

    override fun operation(): String {
        logger.info("실체 객체 호출")
        Thread.sleep(1000)
        return "data"
    }
}
class ProxyPatternClient(
private val subject: Subject
) {
fun execute() {
subject.operation()
}
}@Test
fun `실제 객체를 호출한다`() {
val subject: Subject = ReadSubject()
val client = ProxyPatternClient(subject)
client.execute()
client.execute()
client.execute()
}테스트 코드를 실행해보면 1초 간격으로 3회 실행된다.

여기에 프록시 패턴을 적용해보자.
프록시 객체를 대신 호출하는 예시

class ProxySubject(private val subject: Subject) : Subject {

    private val operationValue: String by lazy { subject.operation() }

    override fun operation(): String {
        return operationValue
    }
}
@Test
fun `프록시 객체를 호출한다`() {
val subject: Subject = ReadSubject()
val proxySubject: Subject = ProxySubject(subject)
val client = ProxyPatternClient(proxySubject)
client.execute()
client.execute()
client.execute()
}테스트를 실행하면 실제 객체는 1회만 호출된다.

1. client는 realSubejct대신 proxySubject를 호출한다. 이 proxy는 같은 인터페이스를 구현하고 있어 클라이언트 입장에서는 실제 객체를 호출하는 것으로 보인다.
2. proxySubject의 operationValue는 null인 경우 realSubject의 operation()을 호출하고 값을 저장한다. 이후 다시 요청이 오면 저장된 값을 반환해 실제 객체의 호출이 생략된다.
다음으로 데코레이터 패턴을 보자.
실제 객체를 호출하는 예시

interface Component {
    fun operation(): String
}
class RealComponent : Component {

    private val logger = LoggerFactory.getLogger(this::class.simpleName)

    override fun operation(): String {
        logger.info("RealComponent 실행")
        return "data"
    }

}
class DecoratorPatternClient(
private val component: Component
) {
private val logger = LoggerFactory.getLogger(this::class.simpleName)
fun execute() {
val result = component.operation()
logger.info("result = $result")
}
}@Test
fun `실제 객체를 호출한다`() {
val component: Component = RealComponent()
val client = DecoratorPatternClient(component)
client.execute()
}테스트를 실행해보면 다음과 같다.

이제 데코레이터 패턴을 적용해서 응답하는 데이터를 변행 해보자
데코레이터 패턴을 사용한 예시

class MessageDecorator(val component: Component) : Component {

    private val logger = LoggerFactory.getLogger(this::class.simpleName)

    override fun operation(): String {
        logger.info("MessageDecorator 실행")
        val result = "***${component.operation()}***"
        logger.info("MessageDecorator 실행")
        return result
    }

}
@Test
fun `데코레이터 패턴을 사용하여 객체를 호출한다`() {
val component: Component = RealComponent()
val messageDecorator: Component = MessageDecorator(component)
val client = DecoratorPatternClient(messageDecorator)
client.execute()
}테스트 실행 결과는 다음과 같다.

realComponent의 결과를 변형하여 client에게 전달했다.
또 다른 데코레이터 패턴을 추가한 예시
위에서 적용한 데코레이터에 새로운 데코레이터를 입혀본다.
class TimeDecorator(val component: Component) : Component {

    private val logger = LoggerFactory.getLogger(this::class.simpleName)

    override fun operation(): String {
        val startTime = System.currentTimeMillis()
        logger.info("TimeDecorator 시작")
        val result = component.operation()
        logger.info("TimeDecorator 종료")
        val endTime = System.currentTimeMillis()
        logger.info("실행 시간 ${endTime - startTime} millis")
        return result
    }

}
@Test
fun `데코레이터 패턴을 사용하여 객체를 호출한다`() {
val component: Component = RealComponent()
val messageDecorator: Component = MessageDecorator(component)
val timeDecorator: Component = TimeDecorator(messageDecorator)
val client = DecoratorPatternClient(timeDecorator)
client.execute()
}테스트 결과는 다음과 같다.

데코레이터를 중첩하여 적용할 수도 있다.